|
||||||||||||||||||||||
| This page last modified: 2009/04/14 The scripting finished: 2008/02/03 |
||||||||||||||||||||||
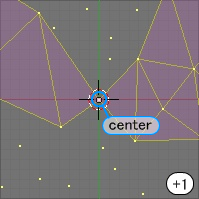
How does Script t15 Skin Point Cloud? I improved the previous version Script t6 and created the upgraded version, Script t15. The major change is that several algorithms have been added to get a better skinning. Script t15 has the new algorithm to avoid forming the intersection of faces, which was a main problem in Script t6. And the script calculates an average normal to decide where to make faces. Here are briefly the steps that Script t15 takes +1. Select a vertex as a center vertex All the steps from +1 through +11 are repeated for each vertex in the point cloud, by selecting it as a center. The steps from +1 through +6 under the step +8 are also repeated for each group that has been made in the upper step +8. The details and images are following
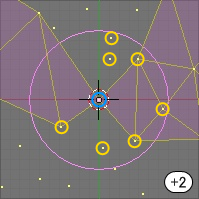
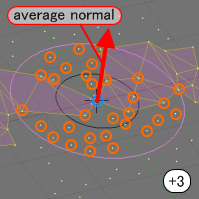
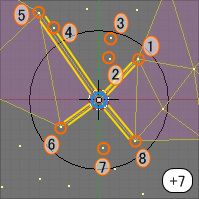
Script t15 starts with selecting a vertex as a center vertex as well as Script t6 (+1). Then t15 measures the distance between each vertex and the center, and collects the closer vertices by the distance (+2). Next t15 collects another a bit more vertices by the distance (+3). Using those vertices, t15 decides an average normal of them based on the method of least square. Using the normal, t15 is going to decide where to make faces to skin the vertices in the following steps.
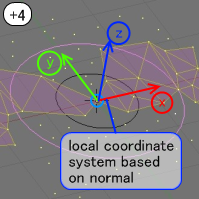
t15 defines a local coordinate system for the vertices collected in the step +2, using the normal calculated in the step +3 (+4). The axis z of the coordinate system is set to the direction of the normal, and the axis x and y are not so important and are set appropriately. From here, t15 ignores the z-coordinate values of the vertices to make it easy, and considers the vertices on the x-y plane in 2D way.
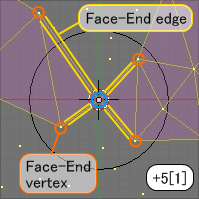
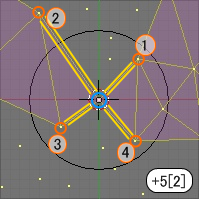
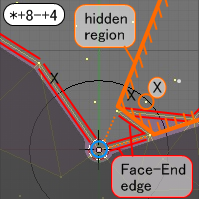
Next, t15 searches for the Face-End edges around the center and collects the Face-End vertices (+5). The new words, Face-End edge and Face-End vertex, are defined to explain the following steps. The Face-End vertices (orange circle marks) are located around the center and have the edges that are linked to the center. Moreover, the edges have only one face on it in a single side. That's the Face-End vertex. Please see at here for more details on the words. After collecting the Face-End vertices, t15 sorts them by the angles from the axis x on the x-y plane as seen in the image +5[2].
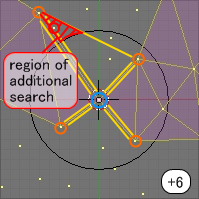
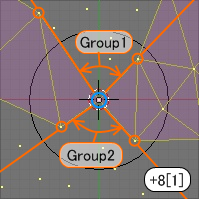
The step +6 is needed only when a Face-End vertex is far from the center. In the case of the image +6, the left Face-End vertex has a longer distance than the threshold that is used in the step +2, and t15 does additional search for the vertices in the region that looks like a triangle that is formed with the left Face-End vertex (red hatched region) (+6). The obtained vertices are added to those collected in the step +2. Then, t15 sorts the collected vertices by the angles in the same way as in the step +5 (+7). And t15 separates them by the faces that exist already and makes groups (+8). The example of the image +8[1] has two groups, which are named as Group1 and Group2.
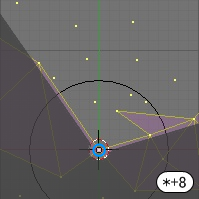
The steps from +1 to +6 under the step +8 are done for each group, so I'm going to pick up Group1 from the two groups here and focus on it as seen in the image +8[2]. The example of the image +8[2] is too simple, so I'm going to change it to more complex one *+8 to see how effective the following steps are, adding the prefix *.
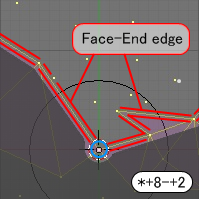
t15 initializes some values to take a new group (+8-+1). Next, t15 searches for the Face-End edges (red edges) in the collected vertices and collect them all for the step +8-+4 (+8-+2).
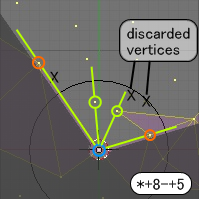
Now that the vertices have been sorted, t15 can find the adjacent two vertices easily. t15 measures all the angles between the adjacent two vertices and checks if the angles are too small (+8-+3). If an angle is too small, t15 discards one of the two that is far from the center. In the step +8-+4, t15 looks at the vertices from the center. If they are hidden by the Face-End edges collected in the step +8-+2 (red edges) and can't be seen from the center, then t15 discards the hidden vertices (orange circle mark) (+8-+4).
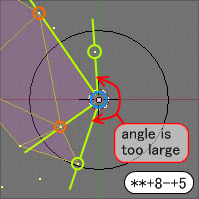
Using the angles measured in the step +8-+3, t15 checks if the angles are too large (+8-+5). If an angle is too large, t15 doesn't make a face there. In the example of the image *+8-+5, there are no angles that are too large, so I'm going to bring another example **+8-+5, which has a too large angle (red region).
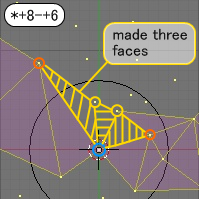
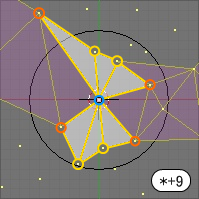
Back to the example of *+8-+5. Then, using the left vertices, t15 makes faces (yellow hatched faces) simply around the center (+8-+6), and the steps for the group are completed. t15 goes to the step +8-+1 and repeats if there are groups that haven't been finished yet, and goes to the step +9 if all the groups have been done. Then, t15 combines all of the faces that have been made in the groups (+9).
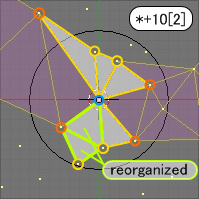
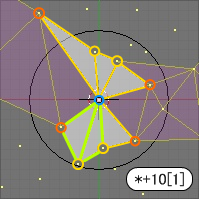
From here, t15 will do the same way as t6. t15 checks if two adjacent triangles have a good shape and reorganizes them if it is better (+10). This can also make the final faces look good. Finally, t15 registers the final faces that have been made through the steps of +1 to +10 to FacesManager (+11). FacesManager is a class that I made in Python to manage faces and please visit here for more details. These steps of +1 to +11 are a cycle to skin vertices around a center vertex, so t15 selects another vertex as a center vertex again and repeats the steps until all vertices have been done (+12). That is all of how Script t15 skins point cloud.
.blend File Here is a .blend file that includes the whole codes of t15 and a skinned point cloud. Trial and results You can see the results of the skinning that t15 produced at here. How to setup the parameters When you use t15 for your own point cloud, you should setup them aproximately. Here are what the parameters mean and how you can adjust them. |