|
Template Python Code to Make It Easily to Use JModelica (JMUs) Optimization
Introduction
To start to use JModelica (a tool to solve optimal control problem), first we have to create a Python code by our own. To solve an optimization problem with JModelica, we have to load a .mop definition file, then setup the solver configuration, launch JModelica and draw a figure to see the results.
User’s Document has many sample codes from very simple one to more advanced one and it’s very helpful, however there are still a lot of work to start to use JModelica and we have to create our own workflow to use it.
Several days after you started to use JModelica, you will establish your own workflow of how to use JModelica with your own template codes including .mop and .py files. I thought it would be a good idea if I share my template code so that anyone who wants to use JModelica can quickly start what they want to do. I created my template codes especially for beginners to start to use JModelica with no pain and to obtain the optimization result immediately.
First of all, what is this?
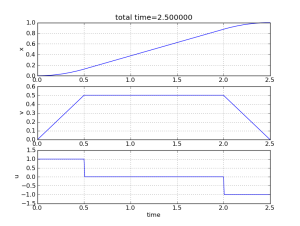 |
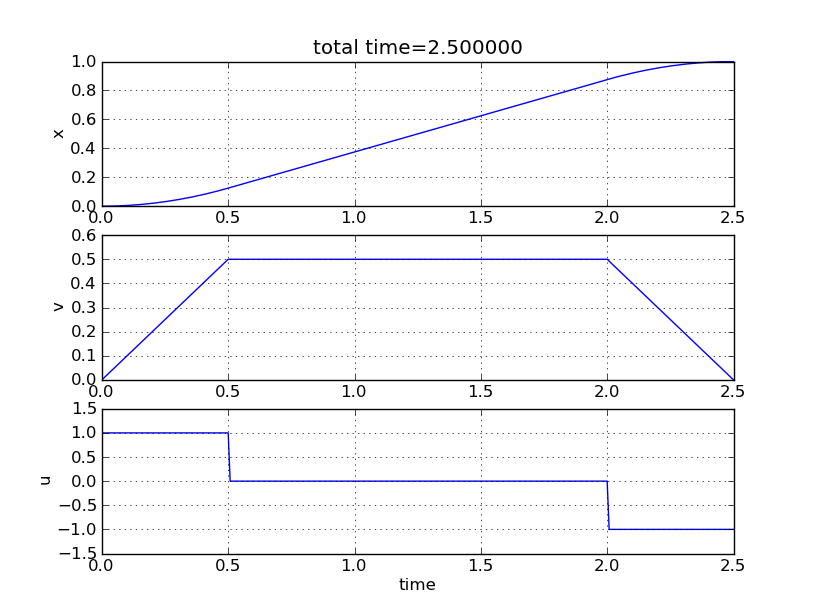
| An example of optimization result [Zoom] |
This is a template Python code set which makes it easy to use JModelica to solve optimal control problem.
The template includes a sample model definition file (opt_definition.mop) and a .bat file (run_me.bat) to start its calculation. After download the template, immediately you can run JModelica by only double-clicking run_me.bat file, and obtain the optimization result with a figure seen in the right side.
The name of the latest version
Template Code Set for JModelica 1.7 (JMUs) v1.0
The released date of the latest version
2012/05/28
Download
JModelica17_JMU_Template_v1_0.zip
Main features
How to run the template first
To run JModelica with the template for the first time:
(This will solve the sample optimal control problem included in the template and you will get the optimization result immediately.)
| +1. |
Download file “JModelica17_JMU_Template_v1_0.zip” from here. Then unzip it and make sure the following files were created:
- 1 .mop file: "opt_definition.mop"
- 3 .py files: "opt_driver.py", "opt_helper.py", "plot_definition.py"
- 1 .bat file: "run_me.bat"
|
| +2. |
Open file "run_me.bat" with any text editor. |
| +3. |
Find the following line at #3:
set PY_BASE=C:\Program Files\Python27
and
change it to the path where Python 2.7 is installed on your PC. |
| +4. |
Find the following line at #4:
set JMO_BASE=C:\JModelica.org-1.7
and
change it to the path where JModelica is installed on your PC. |
| +5. |
Save the change of "run_me.bat". |
| +6. |
Run file "run_me.bat" by double-clicking it to get the optimization result. |
| +7. |
A figure will be shown and you will obtain the optimized trajectories like this. |
How to modify the template for your own use
To modify the codes in the template and to use it for your own project:
(We assume you've already done the settings in section "How to run the template first".)
| *** |
This section shows the overall workflow. For more details, please keep reading the next sections, too. |
| +1. |
Change file "opt_definition.mop" to define your optimal control problem. See section "How to modify file opt_definition.mop" below for the details. |
| +2. |
Change file "opt_driver.py" to setup the solver parameters and settings. See section "How to modify file opt_driver.py" below for the details. |
| +3. |
Change file "plot_definition.py" to draw your own figures. See section "How to modify file plot_definition.py" below for the details. |
| *** |
You don’t have to change file "opt_helper.py", which is the library for the template. |
| *** |
You don’t have to change file "run_me.bat", which is a simple launcher to start JModelica. |
How to modify file "opt_definition.mop"
| +1. |
To create your own definition of optimal control problem, you have to define these four parts in a .mop file: variables, dynamics equations, an objective formula, and constraints if any. To start easily, copy the sample file "opt_definition.mop". Here is the content of "opt_definition.mop".
optimization TemplateOpt (
    objective=finalTime, // <--[A]
    startTime=0,
    finalTime(free=true, min=0, max=5, initialGuess=3))

    parameter Real m = 1; // <--[B1]

    Real x(start=0, fixed=true); // <--[B2]
    Real v(start=0, fixed=true); // <--[B3]
    input Real u(min=-1, max=1); // <--[B4]

equation

    der(x) = v; // <--[C1]
    der(v) = u / m; // <--[C2]

constraint

    v <= 0.5; // <--[D1]

    x(finalTime) = 1; // <--[D2]
    v(finalTime) = 0; // <--[D3]

end TemplateOpt;
|
| The code of the sample file "opt_definition.mop" |
This code above defines a minimum time control problem where the dynamics is m * d^2 x/dt^2 = u. Solving the problem gives the trajectory of u (acceleration) which minimizes time to go from the state x=0 (position), v=0 (velocity) to the state x=1, v=0 under the constraints of v <= 0.5. |
| +2. |
Define your variables like [B1]-[B3] in the code above. You have to define all the variables that you use in this .mop file. |
| +3. |
Define your dynamics equations like [C1]-[C2] in the code above. You have to specify motion equations in a derivative style. |
| +4. |
Define your objective formula like [A] in the code above. Specify the formula that you want to minimize. |
| +5. |
Define your constraints like [D1]-[D3] in the code above. You can specify them in an equation style like a = b or an inequation style like a >= b or a <= b. If you have no constraints, it's ok to leave it empty. |
| *** |
You can find several .mop examples in User’s Document from here and can learn more about how to write the definition of the problem in Modelica/Optimica. |
How to modify file "opt_driver.py"
| +1. |
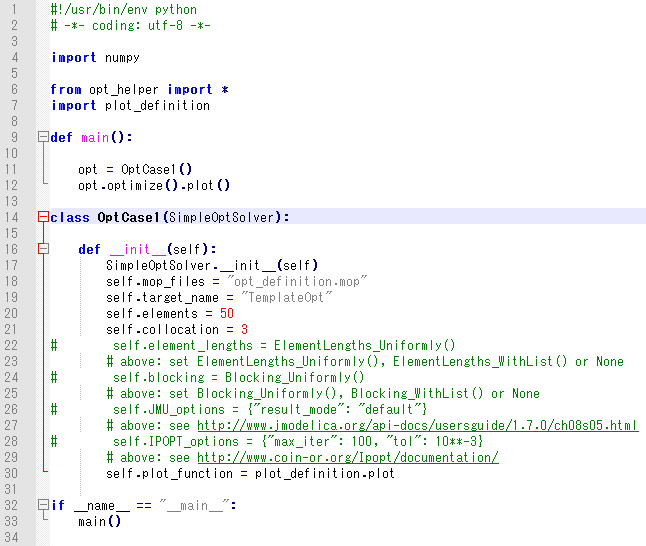
When you open file "opt_driver.py", it looks like the following image:
 |
| The code of file "opt_driver.py" [Zoom] |
"opt_driver.py" mainly contains the solver parameters and settings. We're going to change the settings in function "OptCase1.__init__" in the steps below. |
| +2. |
Change property "mop_files" to your .mop file name. You have to specify something here. |
| +3. |
Change property "target_name" to your optimization model name defined in your .mop file. You have to specify something here. |
| +4. |
Change property "elements", which means the number of elements of the finite element mesh. You could comment out this line to use the default of 50.
If you increase the number, you will obtain more accurate and detailed result, but it will take longer time. |
| +5. |
Change property "collocation", which means the number of collocation points in each element. You could comment out this line to use the default of 3.
JModelica uses the collocation method in its solver. If you increase the number, you will obtain more accurate and detailed result, but it will take longer time. You can also set 0 not to use the collocation method. |
| +6. |
Set property "element_lengths" to ElementLengths_WithList([...]) if you want to change each element time lengths. You could comment out this line to use the default. |
| +7. |
Set property "blocking" to Blocking_Uniformly() if you want the elements to be kept constant. You could comment out this line to use the default. You will obtain an indented trajectory as result. |
| +8. |
Set property "JMU_options" in form of {“parameter name”: value, ...} if you want to set other JMU parameters which can be seen here. You could comment out this line to use the default. |
| +9. |
Set property "IPOPT_options" in form of {“parameter name”: value, ...} if you want to set IPOPT parameters which can be seen here. You could comment out this line to use the default |
| +10. |
You can create another optimization cases by copying class "OptCase1" and creating your own class. By modifying the code in function "main", you can control which case to be optimized, or you can optimize several cases at once. |
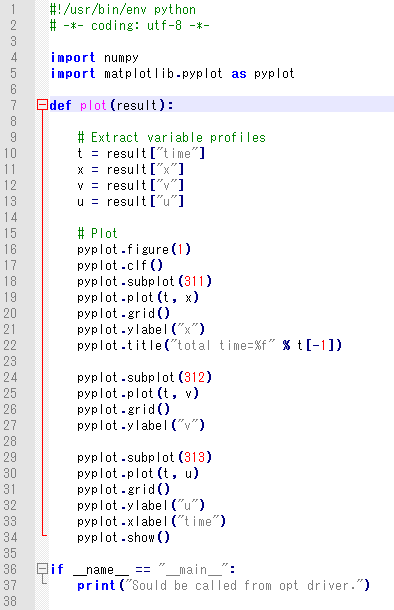
How to modify file "plot_definition.py"
Requirements
This template works with the followings installed:
You can run "run_me.bat" on Windows only. If you use Mac or Linux PC, you have to translate the content of the .bat file into your OS.
I confirmed it worked well with Python 2.7.2, Numpy 1.6, matplotlib 1.1.0, and JModelica 1.7 on Windows 7. Please visit each link on the name above for the installation.
Threads to discuss
You can discuss this template on this thread in JModelica forum.
|